
Tire pressure from scratch
The one setting that changes grip, comfort and speed every ride. Get a real starting point for your weight and tire, set it with a gauge you can trust, then adjust for the day.
Tire pressure is the cheapest upgrade on the bike and the one most riders get wrong. Too high and the tire skips off roots and rattles your hands. Too low and it squirms in corners, burps air and dents rims. The right number depends on you and your tire. The sidewall shows a permitted range, or a maximum: a limit to stay inside, never a target.
What you need
- A digital gauge that reads low pressures well. Gas-station gauges and most floor-pump dials are built for 60 psi and up; at 22 psi they can be off by several psi.
- Your riding weight in kit: you plus helmet, shoes, pack and water.
- The tire size printed on the sidewall, for example 29 × 2.4.
- The internal rim width in millimetres, if you know it. It’s on the rim sticker or the wheel’s spec sheet.
- Whether you run tubeless or tubes.
Limits first: stay within the pressure range printed on the tire and the maximum printed on the rim. Those numbers override anything in this guide or in the app.
1. Get your starting numbers
Open MTB Mate, enter your weight, your bike type and the tire size, and read the front and rear tire cards. Behind those two numbers:
- Weight sets the base. Heavier riders need more pressure to keep the same tire shape under load.
- Volume sets the slope. A wider, higher-volume tire holds more air, so it needs less pressure for the same support. Going from 2.3 to 2.5 inches usually lets you drop a couple of psi. MTB Mate flattens the weight curve for wide tires so a 2.6 doesn’t get over-inflated.
- The rear runs higher. It carries more of your weight, so it gets roughly 2–4 psi more than the front.
- Bike type sets the baseline. MTB Mate starts downhill and enduro setups a little lower than cross-country, because those tires are usually run on stronger casings and at wider widths; gravel and road bikes live in a much higher band. Each type has a safe range, and anything in the caution zone is flagged. Fast, rocky riding can still want more pressure than the baseline: that’s what step 4 is for.
- Bike weight, for e-MTBs. Enter the bike’s weight and the tire pressures shift with it, capped at ±4 psi. Suspension stays rider-weight-driven.
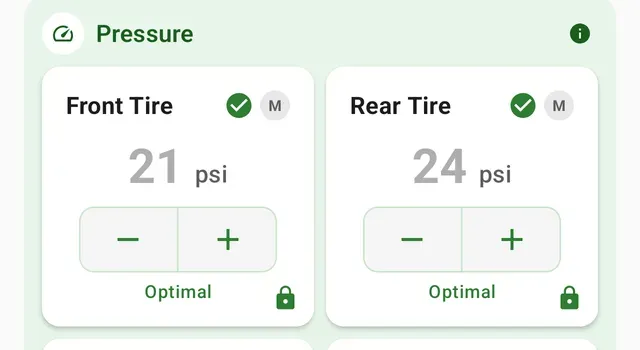 Tap − or + on a card and the value locks, so a later recalculation won’t overwrite what you chose.
Typical trail numbers for a 75 kg rider on 29 × 2.4 tires: about 21 psi front and 24 psi rear. If your numbers are far from that, check the tire size and weight you entered before anything else.
2. Refine for your setup
In the Enthusiast and Expert interface modes (Settings → Interface), the setup exposes a few more inputs. They’re all free; MTB Mate hides them from the Casual mode so the first screen stays simple.
| Input | What it does |
|---|---|
| Rim width | Wider internal rims support the tire’s sidewall, so the app takes off 0.2 psi per millimetre above 25 mm |
| Pack weight | Adds 0.3 psi per kilogram: a 5 kg hydration pack is worth about 1.5 psi |
| Tubeless | The app starts tubeless about 1 psi lower than tubes, since there is no tube to pinch; with tubes, keep a margin against pinch flats |
| Comfort / performance | Slides the recommendation up to 3 psi either way inside the safe band |
| Temperature | Air pressure follows temperature. Enter today’s, and the app compensates for a cold start |
Tire inserts are not a field in the app. An insert reduces the risk of rim damage and burping at lower pressure; it does not remove it. Start at the app’s number and come down a psi at a time, watching for the tire folding in corners, burping, or hitting the rim, and stay within the insert maker’s pressure limits.
3. Set it with a gauge you trust
- Inflate with the floor pump, then check with the digital gauge. Pump dials are for getting close, not for the last 2 psi.
- Set the rear first, then the front. Tap Pump mode in the setup for big numbers and a psi / bar / kPa toggle that matches your gauge.
- Tubeless: bounce the wheel and listen. A fresh setup can lose a couple of psi overnight while the sealant finds the pinholes; check again before the first ride.
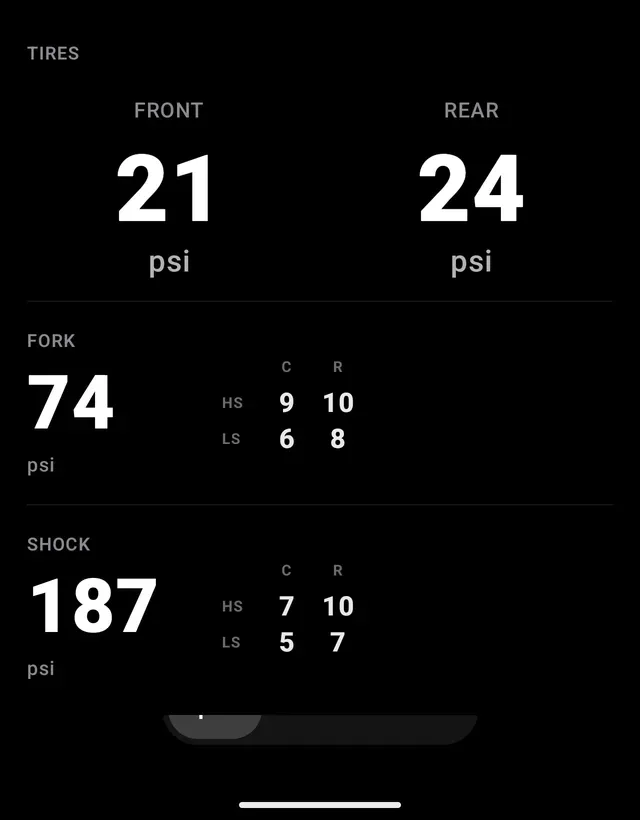 Trailhead view: the numbers stay on screen while you pump.
Check pressure before every ride, or at least weekly. Tires lose a few psi a week through the casing, and a cold morning reads lower than the garage did.
4. Adjust for the day
The app’s number is the starting point for typical conditions. Move from it on purpose:
Two things pull in opposite directions, so decide which one matters more today:
- Impact protection. Sharp rocks, square edges, bike-park hits and fast rough trail push you up: add 1–2 psi, or fit an insert and keep the pressure.
- Traction and comfort. Wet, muddy or loose ground, and rough surfaces like roots and chunky hardpack, reward a softer casing: drop 1–2 psi so the tire conforms instead of bouncing. On rough ground a slightly lower pressure often rolls faster, not slower, because the tire stops skipping.
- Smooth hardpack and road climbs — this is the one place a psi or two up genuinely rolls faster.
- Carrying more today — a full pack is real weight; the pack-weight field exists for a reason.
Make one change at a time and notice what it did. Two psi is a big step on a mountain-bike tire; half a psi is a real, feelable step for experienced riders.
Reading the symptoms
| What you feel | First thing to try |
|---|---|
| Tire squirms or folds in corners | +2 psi on that tire |
| Rim strikes, dented rim, burping | +2 psi on the affected tire, or fit an insert |
| Bouncing off roots, hands numb, skittish | −1 to −2 psi |
| Front washes out in loose turns | −1 psi front |
| Pinch flats with tubes | +2 psi, or go tubeless |
| Feels dead and slow on hardpack | +1 psi both |
Common mistakes
- Running the same pressure front and rear. The rear wants more.
- Trusting a gas-station or pump-dial gauge at 20 psi.
- Inflating to the sidewall number. Sidewall figures are limits, not a suggestion for your weight and trail.
- Setting it once in spring and never checking again.
- Copying a friend’s pressure. Different weight, different tire, different rim.
Once you land somewhere that works, save the setup. MTB Mate keeps the locked pressures with the bike, so next season you start from your numbers, not from scratch.